准备
- Intellij IDEA 2019
- JDK 1.8
- Maven 3.3.9
- Spring 5.2.2.RELEASE
- Tomcat 8.5.45
使用 maven-archetype-webapp 新建工程
pom.xml 加入依赖项1
2
3
4
5
6
7
8
9
10
11
12
13
14
15
16
17
18
19
20
21
22
23
24
25
26
27
28
29
30
31
32
33
34
35
36
37
38
39
40
41
42
43
44
45
46
47
48
49
50
51
52
53
54
55
56
57
58
59
60
61
62
63
64
65
66
67
68
69
70
71
72
73
74
75
76
77
78
79
80
81
82
83
84
85
86
87
88
89
90
91
92
93
94
95
96
97
98
99
100
101
102
103
104
105
106
107
108
109
110
111
112
113
114
115
116
117
118
119
120
121
122
123
124
125
126
127
<project xmlns="http://maven.apache.org/POM/4.0.0"
xmlns:xsi="http://www.w3.org/2001/XMLSchema-instance"
xsi:schemaLocation="http://maven.apache.org/POM/4.0.0 http://maven.apache.org/xsd/maven-4.0.0.xsd">
<parent>
<artifactId>poc</artifactId>
<groupId>cn.burningbright.poc</groupId>
<version>1.0-SNAPSHOT</version>
</parent>
<modelVersion>4.0.0</modelVersion>
<artifactId>spring_mvc_start</artifactId>
<version>1.0-SNAPSHOT</version>
<packaging>war</packaging>
<properties>
<project.build.sourceEncoding>UTF-8</project.build.sourceEncoding>
<project.reporting.outputEncoding>UTF-8</project.reporting.outputEncoding>
<java.version>1.8</java.version>
</properties>
<dependencies>
<dependency>
<groupId>org.springframework</groupId>
<artifactId>spring-webmvc</artifactId>
<version>5.2.2.RELEASE</version>
</dependency>
<dependency>
<groupId>javax.servlet.jsp</groupId>
<artifactId>jsp-api</artifactId>
<version>2.2</version>
<scope>provided</scope>
</dependency>
<dependency>
<groupId>javax.servlet</groupId>
<artifactId>jstl</artifactId>
<version>1.2</version>
</dependency>
<dependency>
<groupId>javax.servlet</groupId>
<artifactId>javax.servlet-api</artifactId>
<version>3.1.0</version>
<scope>provided</scope>
</dependency>
<dependency>
<groupId>org.projectlombok</groupId>
<artifactId>lombok</artifactId>
<scope>provided</scope>
<version>1.18.4</version>
</dependency>
<!-- 记录log日志 logback-core并不需要显示导入-->
<dependency>
<groupId>ch.qos.logback</groupId>
<artifactId>logback-classic</artifactId>
<version>1.2.3</version>
</dependency>
<!-- Spring MVC自动数据封装依赖的包 否则可能出现下面的错误,若使用@RequestBody的时候 -->
<!-- Content type 'application/json' not supported 当然还有其余配置,原理了解-->
<!-- 此处需要导入databind包即可, jackson-annotations、jackson-core都不需要显示自己的导入了-->
<dependency>
<groupId>com.fasterxml.jackson.core</groupId>
<artifactId>jackson-databind</artifactId>
<version>2.9.8</version>
</dependency>
<!-- fastjson -->
<dependency>
<groupId>com.alibaba</groupId>
<artifactId>fastjson</artifactId>
<version>1.2.57</version>
</dependency>
</dependencies>
<build>
<plugins>
<!-- 该插件是为了没有web.xml情况下,打war包。编译不要报错 -->
<plugin>
<groupId>org.apache.maven.plugins</groupId>
<artifactId>maven-war-plugin</artifactId>
<version>2.6</version>
<configuration>
<failOnMissingWebXml>false</failOnMissingWebXml>
</configuration>
</plugin>
<!-- 编译环境在1.8编译 -->
<plugin>
<groupId>org.apache.maven.plugins</groupId>
<artifactId>maven-compiler-plugin</artifactId>
<version>3.8.0</version>
<configuration>
<source>${java.version}</source>
<target>${java.version}</target>
<compilerVersion>${java.version}</compilerVersion>
<encoding>${project.build.sourceEncoding}</encoding>
</configuration>
</plugin>
</plugins>
<!--
directory:属性指定资源文件放置的目录。
includes:包含哪些配置文件(.class文件不用写)
filtering:如果设置为false的话,则表示上文的filters配置失效;如果设置为true,则会根据${env}.properties里面的键值对来
填充includes指定文件里的${xxxx}占位符(若不做环境区分,一般就是false即可)
-->
<resources>
<resource>
<directory>src/main/webapp</directory>
<includes>
<include>**/*.properties</include>
<include>**/*.xml</include>
<include>**/*.tld</include>
</includes>
<filtering>false</filtering>
</resource>
</resources>
</build>
</project>
值得注意的是
如果不加入 jsp-api 和 jstl 依赖项,访问jsp将抛异常
还有resource 标签中的directory需要指向网页资源
写一个Demo试一下servlet,没问题1
2
3
4
5
6
7
8
9(urlPatterns = "/hello")
public class HelloServlet extends HttpServlet {
protected void doGet(HttpServletRequest req, HttpServletResponse resp) throws IOException {
resp.getWriter().write("hello servlet...");
}
}
注解驱动
- Servlet容器启动会扫描,当前应用里面每一个jar包 ServletContainerInitializer的实现
- 可以使用自实现的类,但一定要在元信息文件中添加实现类类名
META-INF/services/javax.servlet.ServletContainerInitializer
1 | public class MyServletContainerInitializer implements ServletContainerInitializer { |
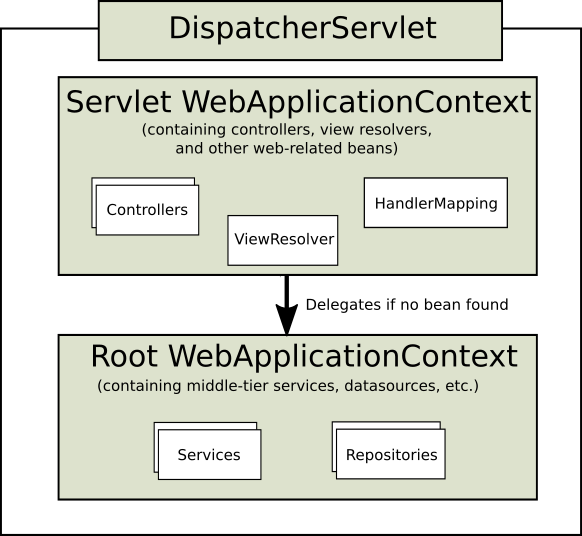
整合Spring MVC
可以看到springWeb包内是同样的形式:

显然spring mvc也是通过这种方式和servlet容器做的整合@HandlesTypes({WebApplicationInitializer.class})
我们需要关注的是 WebApplicationInitializer 接口实现子类们

三个抽象类叠猫猫,从字面上看分别是
抽象_上下文_载入程序_初始化器
为方便注册上下文而设计的一个的基类抽象_分发者_小服务_初始化器
多数应用程序应该考虑扩展下面这个类抽象_注解配置_分发者_小服务_初始化器
需要实现getRootConfigClassesgetServletConfigClasses
配置注解
1 | (value = "cn.burningbright.poc", |
父容器扫包忽略子容器配置类
1 | (value = "cn.burningbright.poc.controller", |
有意思的是,如果web容器配置上不加@EnableWebMvc注解
jsp的访问会报404,可能是因为程序找不到spring mvc 的dispatcher
初始化
来实现自己的初始实体1
2
3
4
5
6
7
8
9
10
11
12
13
14
15
16
17
18
19
20
21
22
23
24
25
26
27
28
29
30
31
32
33
34
35
36
37
38
39public class MyWebAppInitializer extends AbstractAnnotationConfigDispatcherServletInitializer {
/**
* 根容器的配置类
*/
protected Class<?>[] getRootConfigClasses() {
return new Class<?>[]{RootConfig.class};
}
/**
* web容器的配置类(SpringMVC配置文件)
*/
protected Class<?>[] getServletConfigClasses() {
return new Class<?>[]{AppConfig.class};
}
/**
* 获取DispatcherServlet的映射信息
* "/" :拦截所有请求(包括静态资源(xx.js,xx.png)),但是不包括*.jsp;
* "/*":拦截所有请求;连*.jsp页面都拦截;jsp页面是tomcat的jsp引擎解析的;
*/
protected String[] getServletMappings() {
return new String[]{"/"};
}
/**
* 若你想定制化父类的一些默认行为 这里都是可以复写父类的protected方法的~~~~
* Spring MVC也推荐你这么干~
*/
protected FrameworkServlet createDispatcherServlet(WebApplicationContext servletAppContext) {
DispatcherServlet dispatcherServlet = (DispatcherServlet) super.createDispatcherServlet(servletAppContext);
return dispatcherServlet;
}
}
测试一下:
1 |
|
/hello/jsp 和 /hello/ayo 都正常访问
https://github.com/BurningBright/poc/tree/master/spring_mvc_start
【小家Spring】Spring注解驱动开发—-Servlet 3.0整合Spring MVC(不使用web.xml部署描述符,使用ServletContainerInitializer)
Spring 4 MVC HelloWorld 纯注解方式(带源码)【超赞】
【springmvc】使用@EnableWebMvc自定义配置
如何用Java类配置Spring MVC(不通过web.xml和XML方式)
SpringMVC_JSP核心流程+常用注解+请求参数绑定+返回数据视图